

まえがき
PowerShell を起動した際に、バージョン 7.4.1 のリリース通知があったので、winget によるアップデートを試みました。しかし、バージョン 7.4.0 がダウンロードされたため、GitHub から MSI を入手してアップデートしました。
バージョン 7.4.1 にアップデートした後、winget でもバージョン 7.4.1 が利用可能になったため、あと30分待てば winget からアップデートできたようです。少し損した気分です。
MSI を実行した際にスクリーンショットを撮影したので、インストール手順書としてまとめておきます。
クロスプラットフォーム
Windows 10/11 に搭載されているのは、Windows PowerShell 5.1.x です。これを「WPS」と呼びます。
WPS を起動すると、Windows の冠が取れたクロスプラットフォーム版 PowerShell Core 7 をインストールするよう勧められます。この記事では、クロスプラットフォームバージョンの PowerShell Core に焦点を当てています。
*PowerShell Coreはバージョン7から「Core」が取れて、「PowerShell」の名称になりました。
ソフトウェア情報
WPSとPowerShell は共存できる
PowerShell は独立したプログラムとしてインストールされるため、WPSと共存させることができます。
PowerShell は、実行ファイルと参照するプロファイルがWPSと異なるため、独立したコマンドラインシェルとして動作します。
Vim の扱い
WPSのプロファイルには、vim.exe のフルパスを指定したエイリアスが設定されているため、PATHに含まれていなくても vim を実行できます。一方、PowerShell が使用するプロファイルはWPSとは別のフォルダーを参照するため、そのままでは Vim を実行できません。
対策としては、PowerShell用のプロファイルを作成してエイリアスを設定するか、環境変数 PATH に vim.exe のフルパスを追記します。
| バージョン | 表示名 | 実行ファイル |
| PowerShell 5.1 | Windows PowerShell | powershell.exe |
| PowerShell 7.x | PowerShell 7 (x64) | pwsh.exe |
PowerShell インストール手順書
GitHubからMSIインストーラーを入手して PowerShell をインストールしたのでスクリーンショットを掲載します。
使用したファイル:PowerShell-7.4.1-win-x64.msi
| OS | Windows 11 23H2 64-bit |
| ファイル | PowerShell-7.4.1-win-x64.msi |
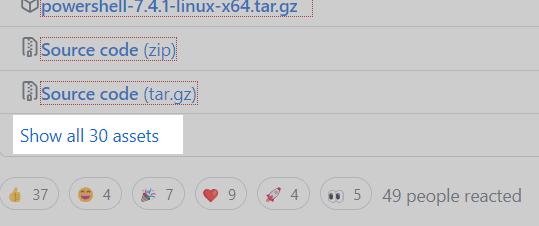
MSIインストーラーのダウンロード
Assets > Show all 30 assets(下方にあります)
[Show all 30 assets] を展開して PowerShell-7.4.1-win-x64.msi を探す。
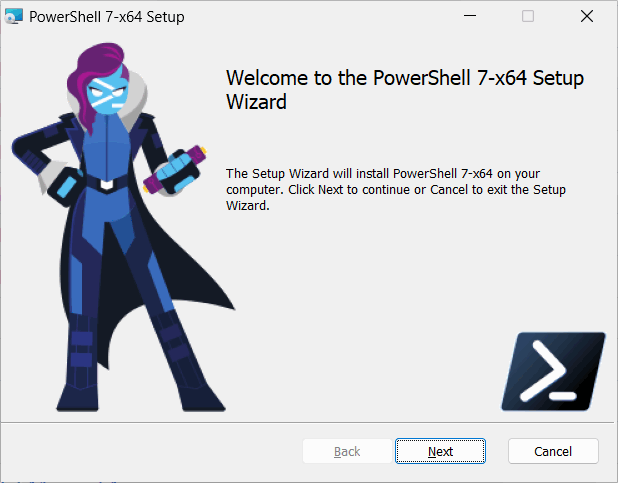
Welcome to the PowerShell 7-x64 Setup Wizard
The Setup Wizard will install PowerShell 7-x64 on your computer. Click Next to continue or Cancel to exit the Setup Wizard.
Nextをクリック
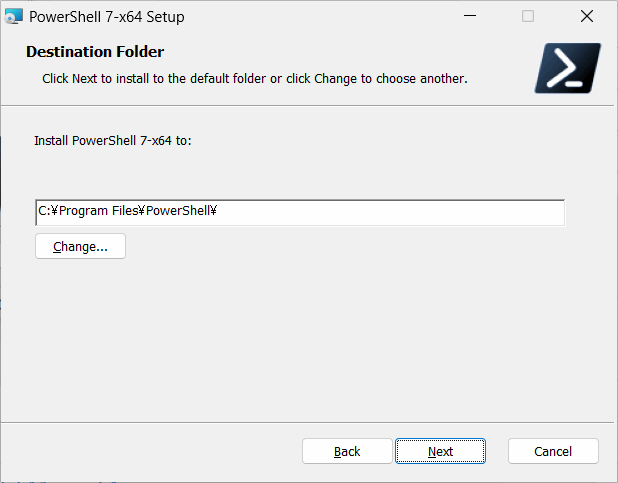
Destination Folder
Click Next to install to the default folder or click Change to choose another.
PowerShell をインストールするターゲットフォルダーを選択する(Change... でフォルダー選択)
C:\Program Files\PowerShell\(既定値)
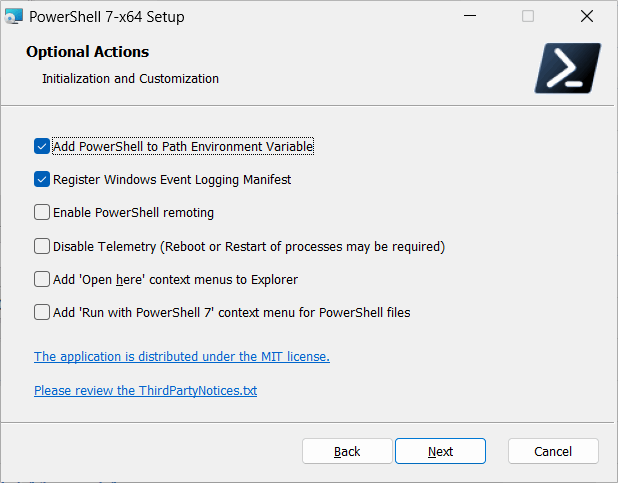
Optional Actions
Initialization and Customization
初期化とカスタマイズ
- Add PowerShell to Path Environment Variable
Path環境変数にPowerShellを追加する - Register Windows Event Logging Manifest
Windowsイベントロギングマニフェストの登録 - Enable PowerShell remoting
PowerShellリモーティングを有効にする - Disable Telemetry (Reboot or Restart of processes may be required)
テレメトリーを無効にする(プロセスの再起動またはリスタートが必要な場合があります) - Add 'Open here' context menus to Explorer
エクスプローラーに「ここで開く」コンテキストメニューを追加 - Add 'Run with PowerShell 7' context menu for PowerShell files
PowerShellファイルのコンテキストメニューに「PowerShell 7で実行」を追加する
Use Microsoft Update to help keep your computer secure and up to date
Microsoft Update helps keep your computer secure and up to date for Windows and other Microsoft products, including PowerShell 7. Updates will be delivered based on your current update settings. You can review or change these settings from the Windows Update control panel.
Microsoft Update は、PowerShell 7 を含む Windows やその他の Microsoft 製品について、お使いのコンピュータを安全かつ最新の状態に保つのに役立ちます。更新プログラムは、現在の更新プログラム設定に基づいて配信されます。これらの設定は、Windows Update コントロール パネルから確認または変更できます。
- Enable updating PowerShell through Microsoft Update or WSUS (recommended)
Microsoft UpdateまたはWSUSによるPowerShellのアップデートを有効にする(推奨) - Use Microsoft Update when I check for updates (recommended)
アップデートを確認する際にMicrosoft Updateを使用する(推奨)

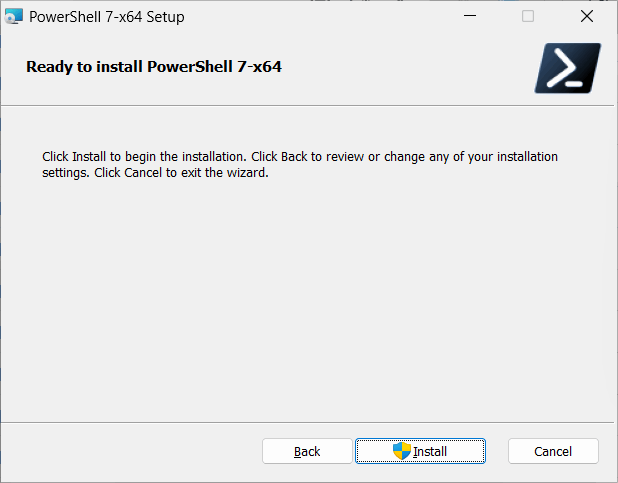
Ready to install PowerShell 7-x64
Click Install to begin the installation. Click Back to review or change any of your installation settings. Click Cancel to exit the wizard.
[Install|Back|Cancel] 処理を選択してください。
ユーザーアカウント制御
インストーラーは管理者特権を要求しています
[はい] を選択

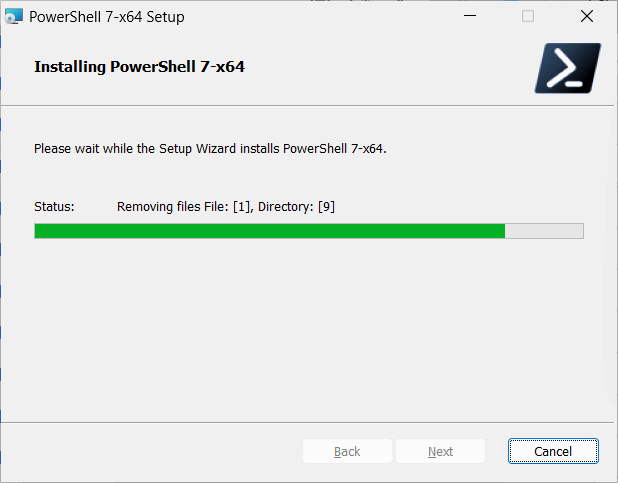
Installing PowerShell 7-x64
Please wait while the Setup Wizard installs PowerShell 7-x64.
処理が終わるまで待つ
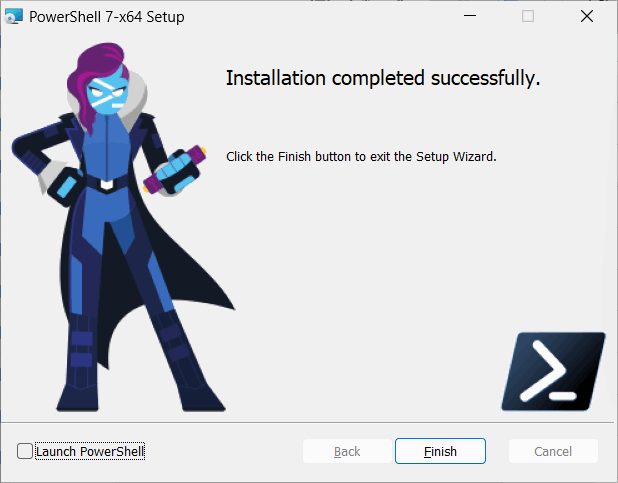
Installation completed successfully.
Click the Finish button to exit the Setup Wizard.
Finishをクリック
PowerShell を起動する方法

PowerShell はスタートメニューから起動することができます。
Windows ターミナルの設定を変更して、PowerShell を既定のプロファイルに設定することができます。
PowerShell 起動方法
- スタートメニューを開きます。
- 「PowerShell 7」を検索します。
- 「PowerShell 7」を起動します。
Windows ターミナルの設定を変更して、PowerShell を既定のプロファイルに設定することもできます。
- Windows ターミナルを開きます。
- タブバーから「設定」をクリックします。(>をクリック)
- 「スタートアップ」> 「既定のプロファイル」を「PowerShell」に変更します。
- 「保存」をクリックします。
- 以上

複数のインストール方法(Windows)

PowerShell は複数のインストール方法が提供されています。Winget を利用する方法が推奨されています。
- Winget - Windows クライアントに PowerShell をインストールする(推奨方法)
- MSI パッケージ- Windows サーバーおよびエンタープライズ展開シナリオに最適な選択肢
- ZIP パッケージ- 「サイドロード」または複数のバージョンをインストールする最も簡単な方法
- Windows Nano Server、Windows IoT、および Arm ベースのシステムにはこの方法を使用します。
- .NET グローバル ツール- 他のグローバル ツールをインストールして使用する .NET 開発者にとって良い選択肢です。
- Microsoft Store パッケージ- PowerShell のカジュアル ユーザー向けに簡単にインストールできる方法ですが、制限があります
その他のプラットフォーム
Linux、macOS、Arm のインストール方法は以下のリンクからお探しください。
PowerShell の新機能
[PowerShell 新機能(自動翻訳)]
- Out-GridView、-ShowWindow、およびその他の GUI コマンドレットが Windows に戻りました
- ForEach-Object -Parallel
-Parallel パラメーターを ForEach-Object コマンドレットに追加すると、 PSWorkflowのオプションと同様に、スクリプトブロックを並列実行できます。
- PowerShell 7 での Windows PowerShell モジュールのインポート
PowerShell 6 と互換性のない Windows PowerShell モジュールをインポートできるようになりました。
- クリップボードコマンドレット
Get-ClipboardとSet-Clipboard はWindows、Linux、macOS で使用できます。
- Get-Counter (Windows パフォーマンス カウンター)
- Out-Printer (Windows)
Out-Printerコマンドレットを使用すると、PowerShell オブジェクトをプリンターに送信できます (Windows のみ)。
- Clear-RecycleBin (Windows)
Clear-RecycleBinコマンドレットを使用して Windows のごみ箱を空にできるようになりました。
- Test-Connection テスト接続
Windows PowerShell と PowerShell 7 の間でより一貫したエクスペリエンスが提供されました。
- Null 代入演算子と合体演算子 (?? および ??=)
- Get-Hotfix ホットフィックスの入手 (Windows)
Get-Hotfix は、ローカルまたはリモート コンピューターにインストールされている修正プログラムと更新プログラムを取得します。
- Select-String による強調
- ConciseView による新しいエラー ビュー
エラー用の新しい ConciseView
- 新しい Get-Error コマンドレット
- パイプライン チェーン演算子 (&& および ||)
- 三項演算子
- PowerShell Desired State Configuration (DSC) の改善 (実験的)
- 長期保守サービス
PowerShell 7 は、 .NET Core 3.1がサポートされている限りサポートされます。
参考:wingetコマンドのエラーメッセージ
wingetコマンドで PowerShell をインストールする際に、エラーメッセージ「既存のパッケージが既にインストールされています。」が表示される場合があります。これは、古いバージョンの PowerShell がデバイスに存在することを通知しています。
既存の PowerShell をアンインストールすることで、新しいバージョンの PowerShell をインストールすることができます。
- PowerShell コマンドプロンプトで、以下のコマンドを実行して既存の PowerShell をアンインストールします。
PS C:\> winget uninstall PowerShell
- PowerShell コマンドプロンプトで、以下のコマンドを実行して 7.x をインストールします。
PS C:\> winget install --id Microsoft.Powershell --source winget
- 以上
手順
|
PS C:\> winget install --id Microsoft.Powershell --source winget 既存のパッケージが既にインストールされています。インストールされているパッケージ...をアップグレードしようとしています 新しいバージョンが見つかりましたが、インストールテクノロジが現在インストールされているバージョンと異なります。パッケージをアンインストールして、新しいバージョンをインストールしてください。 PS C:\> winget uninstall PowerShell | |
まとめ

- MSIによる PowerShell バージョン 7.4.1 インストール手順書
- wingetでアップデートできなかったのでMSIを入手してアップデートしたが、現在はwingetからバージョン7.4.1にアップデート可能になっている。
- Windows 10/11 に搭載されているのは、Windows PowerShell 5.1.xxx。この記事は [Windows] の冠がとれたクロスプラットフォーム版の PowerShell を対象にしている。
- PowerShell 7.x は Windows PowerShell 5.1 と共存させることができる。
- PowerShell は Windows、Linux、macOS、Arm の各プラットフォームで利用することができる。
このサイトを検索 | Search this site

![[EventId 1008] BITSのOpenプロシージャに失敗しました(Perflib)](https://blogger.googleusercontent.com/img/b/R29vZ2xl/AVvXsEiN6dqRB2WfXdfAKB10FDjdJ2p22frW5ahcNd07xf7-Dux9uDfiM1RGf7v6iO-QRooVfr3FsZNkpRKcO8Or0JcmQeJ5ud_ns3dfE7tQwoVZB2bsZbTKUaxVjG_CqSTho3hre6kT7T4mOBGz/w680/redyellow_317x.gif)


![en[EVENT10016] Windows.SecurityCenter.WscDataProtection](https://blogger.googleusercontent.com/img/b/R29vZ2xl/AVvXsEhvJoFW2DHhrFvUwjdLrbVO7FvShXv7HF9HAOqhzTJFan_QNy7W-SBOPutM8Qcc3Rwm7KF4cQqL-D4G0_HEUIKRhO9bDnDKXLATmPrbFYfy0fyl2519jSd_TPXHAZBIhG3jE31NQHE8W-Jw/w680/regedit.png)


0 コメント
質問はご遠慮ください。不適切なコメントは公開しません。コメントに自サイトの宣伝を書くのはお控えください。