
,How to use
It's a software that has been used continuously from Windows XP to Windows 10 because it fits my needs.
When you start WinShot, an icon will be displayed in the notification area of the taskbar.
You can double-click or right-click the icon to capture the desktop or any area.
The notification area icons are as follows.
About WinShot
WinShot has stopped development.WinShot 1.53a, released in 2007, is the final version.
※A newer version may be displayed.
Capture method
There are three ways to capture.- Double-click the notification area icon
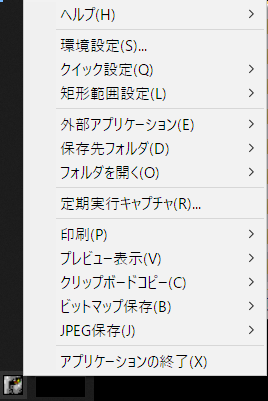
- Right-click the notification area icon and select from the menu
- Use hotkeys
A and C execute the capture operation specified in the environment settings.
The following image is a snapshot of the WinShot icon right-click menu.
All WinShot functions
WinShot is software that allows you to take a snapshot of the image displayed on your PC.The accompanying functions are substantial.
- Capture function
- Preview display function of captured image
- Image processing function
- Save function
- Print function
The preview display of the captured image can be offloaded to an external application.
The options for the capture function and image processing function are as follows.
Capture function
- Entire desktop
- Active window
- Rectangle range specification
- Control /Client
- Scheduled execution capture
Image processing function
- Resize
- trimming
- Subtractive color
- Grayscale conversion
- Sepia color conversion
- rotation
- Negative /positive reversal
WinShot environment setting list
There are various setting items.
- basic configuration
- Quality /color reduction
- Hot key
- Print designation
- Header printing
- Other settings
- resize
- External app
- Character string embedding
- cut
1. Basic settings
This is a list of basic setting items.| Basic settings tab | |
| Save settings | Specify the action to save the captured image |
| Auto save | Specify the save destination, prefix, number of sequence digits, start number, etc. |
| Specify save file name every time | A dialog to specify the save destination of the captured image will be displayed |
| Open save folder after saving | After saving the captured image, open the save folder in Explorer |
| Capture mouse cursor | You can choose whether to include the mouse cursor in the captured image |
 | |
2. Quality /color reduction
| Quality /Color reduction tab | |
| JPEG quality | You can specify the compression rate when saving in JPEG format. Can be saved in progressive JPEG format |
| Image processing | Negative /positive inversion, swapping white and black, grayscale conversion (256 gradation 8bit, 16 gradation 4bit), 256 color /16 color bitmap is RLE compressed |
| Subtractive color | Not reduced, 16 colors, 2 colors (halftone), 256 colors, 2 colors Brightness that is the threshold when two colors are subtracted (1 to 254, default value 128) |
 | |
3. Hotkey
You can assign hot keys to various functions of WinShot and call them from the keyboard with one shot. The hot key setting information can be saved /loaded.
4. Print designation
| Print settings tab | |
| Print size | Automatic adjustment based on paper size and image size |
| Image vertical position | Top alignment, center alignment, bottom alignment |
| Horizontal image position | Left alignment, center alignment, right alignment |
| Specify the margin | Specify top, bottom, left, right margins |
| Other |
|
 | |
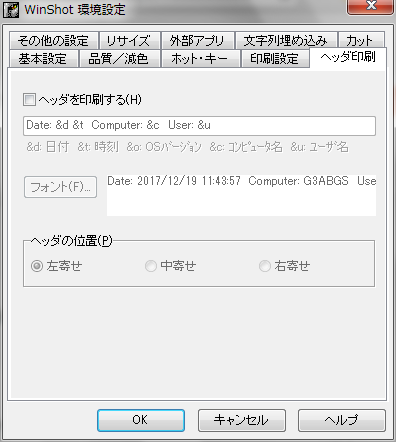
5. Header printing
- Specify whether to print the header
- Specify the position when printing the header: left alignment, center alignment, right alignment
6. Other settings
Double-click operation of tray iconSet the operation when you double-click the Winshot icon displayed in the notification area.
Assignable functions
- Environmental setting
- printing
- Preview display
- Copy to clipboard
- Save as bitmap
- Save as JPEG
- Program termination
Time difference capture
Specify when you want to leave time from when the capture instruction is given until the actual capture. This item is ignored by scheduled capture.
Support non-rectangular windows
Check this option to include non-rectangular windows.
Enable extended active window capture
If you check this option, you can capture the menu expanded during active window capture without breaking.
Use the initial value of control /client capture as the client
If you check this option, the default for control /client capture is client capture.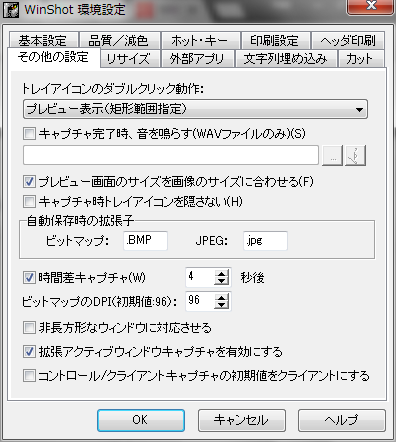
7. Resize
Specify whether to resize at the same time as capturing. To resize, specify the size in pixels.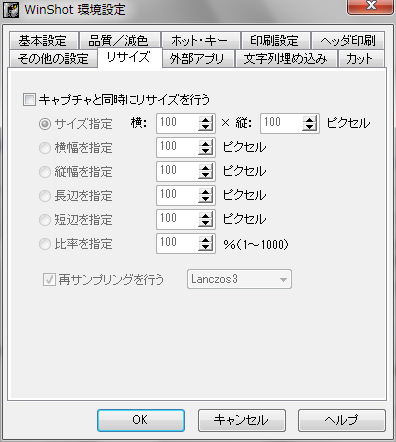
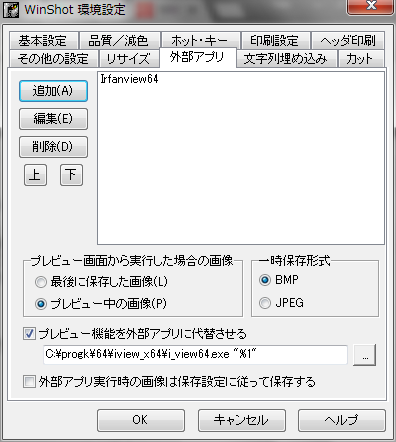
8. External application
It is a setting to display the image captured by WinShot with an external application.The registered external application can be started from the notification area icon or the "external application" on the preview screen.
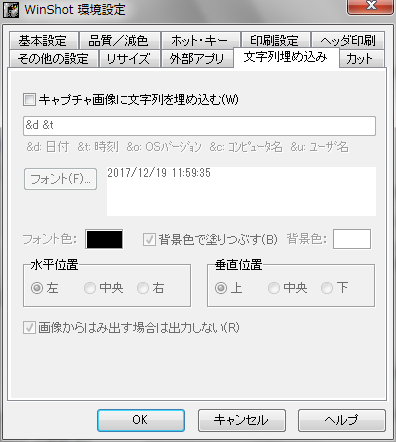
9. String embedding
You can embed a character string in the captured image. Information such as date /time and OS version can be specified in the character string. You can set the font type, size, and color.A background color can be specified when the character string embedded in the captured image is difficult to see. You can specify the horizontal position and vertical position of the embedded character string.
10. Cut
4 sides of the image can be cut (trimmed) at the same time as the capture.The size of the four sides of the image to be cut is specified in pixel units. If the captured image is smaller than the size to cut, this function will not be executed.

Afterword
WinShot is developed on the premise of 96DPI.Windows 8.1 to Windows 10 now support high DPI displays.
If you change the value of "Scale and layout" of Windows 10 to a value other than 100%, you cannot capture correctly with WinShot.
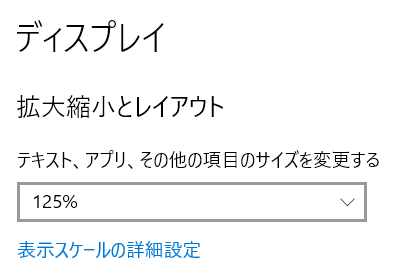
In that case, use WinShot's resizing function.
Display the Resize tab of Preferences and check "☑ Resize at the same time as capture" to take a snapshot after removing the extra captured part.
The help file [WinShot.hlp] included with WinShot cannot be opened in Windows 10. It can be opened by installing WinHlp32.exe.
For the resizing function, WinHlp32.exe, please read the related article.
External link
Verification: WinShot 1.53a
Windows 10 Pro May 2019 Update, v1903.18362.267
Windows 10 Pro May 2019 Update, v1903.18362.267
:SC2
このサイトを検索 | Search this site

![[EventId 1008] BITSのOpenプロシージャに失敗しました(Perflib)](https://blogger.googleusercontent.com/img/b/R29vZ2xl/AVvXsEiN6dqRB2WfXdfAKB10FDjdJ2p22frW5ahcNd07xf7-Dux9uDfiM1RGf7v6iO-QRooVfr3FsZNkpRKcO8Or0JcmQeJ5ud_ns3dfE7tQwoVZB2bsZbTKUaxVjG_CqSTho3hre6kT7T4mOBGz/w680/redyellow_317x.gif)


![en[EVENT10016] RuntimeBroker {15C20B67-12E7-4BB6-92BB-7AFF07997402}](https://blogger.googleusercontent.com/img/b/R29vZ2xl/AVvXsEgIWemCkzPBfjPT3rC3-ZO4C8W5BnQFrwV7BIvXVLKEb0TOZgxnyfS-MVAYUZhmdmHB20mutJOI1N04LhxUpnwgsKzsBTFe5S-jl1H0x1uB1ZH2peyG7fxuXOcccfsIrjkTw4Zv6JFGZ3jL/w680/regedit-search450x.png)


0 コメント
質問はご遠慮ください。不適切なコメントは公開しません。コメントに自サイトの宣伝を書くのはお控えください。