
en-event,event log
This article is about Event ID 10016.
It will be recorded when updated to Windows 10 v1809.
The error is caused by RuntimeBroker (DCOM component), but it is a story of RuntimeBroker that has an APPID different from the cases noted in the past.
Specifically:
| name | APPID |
| RuntimeBroker (this time) | {15C20B67-12E7-4BB6-92BB-7AFF07997402} |
| RuntimeBroker | {9CA88EE3-ACB7-47C8-AFC4-AB702511C276} |
Event ID 10016 is a log recorded when there is a problem with the DCOM component, but it is possible to try to repair it.
Well, the main subject.
DCOM components such as RuntimeBroker are guarded against being edited by an administrator account (such as Administrator).To remove the guard, use Registry Editor to change the owner of the RuntimeBroker.
This article shares the repair steps I have taken.
The procedure described is complicated and difficult, so those who are new to PC do not need to force repair.
If you are interested in event log errors like me, why not try it?
DCOM: Distributed Component Object Model
Event Log
The event log is reprinted.| message | CLSID for application-specific permission settings {2593F8B9-4EAF-457C-B68A-50F6B8EA6B54} And APPID {15C20B67-12E7-4BB6-92BB-7AFF07997402} Local activation permissions for the COM server application on the user xxx\yyy SID (S-1-5-21-3828101160-65458516) at the address LocalHost (using LRPC) running in the application container unavailable SID (not available) -1957545066-1001) cannot be given. This security permission can be modified using the Component Services administration tool. |
| log name | system |
| Source | DistributedCOM (DCOM) |
| Event id | 10016 |
| level | error |
| user | Login User |
| APPID | {15C20B67-12E7-4BB6-92BB-7AFF07997402} |
| APPID name | RuntimeBroker |
Repair procedure
Make a backup before performing the steps described.Then, log in to Windows with an account belonging to Administrators and then execute.
Summary of procedure
Enable [Local Activation] by adding [Users] to RuntimeBroker.- (Registry Editor)
- Change APPID owner
- Add Administrators to group or user names
- Set Administrators to full control
- (Component service)
- Start Component Services
- Add Users to Launch and Activation Permissions
- (Registry Editor)
- Restore owner
- End of procedure
Plan B Information
I've found a tool, ExecTI, that allows component services to be edited directly.ExecTI eliminates the need to use a registry editor, reducing risk.
For details, read the postscript.
1. Procedure to change the owner of APPID
This procedure uses Registry Editor.Change the owner of APPID {15C20B67-12E7-4BB6-92BB-7AFF07997402} from TrustedInstaller to Administrators.
Then change the permissions for Administrators to "Full Control".
Registry operations are at your own risk
Before working with Registry EditorMake a backup copy of your registry in case something goes wrong.
1.1 Start Registry Editor
Run (Win + R), enter regedit as the name, and click OK to start the registry editor.
1.2 Search APPID
Launch the search dialog (Ctrl + F /Edit> Find),Enter the APPID {15C20B67-12E7-4BB6-92BB-7AFF07997402} recorded in the Event Viewer to search.
It hits in multiple places, but the value under\HKEY_CLASSES_ROOT\AppID\is the edit target.
| Search value | {15C20B67-12E7-4BB6-92BB-7AFF07997402} |
| result | \HKEY_CLASSES_ROOT\AppID\{15C20B67-12E7-4BB6-92BB-7AFF07997402} |
 | |
1.3 Select permissions
Right click on {15C20B67-12E7-4BB6-92BB-7AFF07997402} and select "Permissions".
1.4 Select advanced settings
Click "Detailed Settings" at the bottom right.In the image, Administrators is displayed, but in some environments it is not.

Access denied
I feel like I can change Administrators to full control when Administrators is displayed, but when I execute it, the following dialog appears, so I cannot change to full control until I take ownership.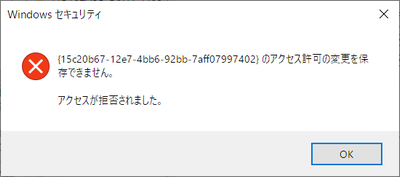
1.5 Click Change
The owner in the upper left of the transition screen is TrustedInstaller, so click Change.
1.6 Click Advanced Settings
Click Advanced on the Select Users or Groups screen.
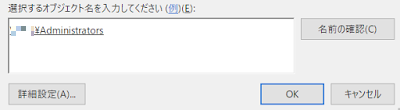
1.7 Select Administrators
Click Search and Administrators will be listed in the search results. Select it and then select OK.There are Administrator and Administrators , so let's select the one with s at the end.

After confirming that the PC name\Administrators has been added in Enter the object to select, click OK, and then click OK on the transition screen.
If the owner changed to Administrators on the 1.5 screen above, the steps you performed were successful.
2. Add Administrators to the group or user name
Don't get confused because it's similar to the previous steps.
In this step, add Administators as a group that can access {15C20B67-12E7-4BB6-92BB-7AFF07997402}.
If Administrators exists, skip it.
In this step, add Administators as a group that can access {15C20B67-12E7-4BB6-92BB-7AFF07997402}.
If Administrators exists, skip it.
- Click "Add" on the Security tab
- Click "Detailed settings" on the transition screen
- Click "Search" on the transition screen
- Click "Administrators" from the search result list on the transition screen to select it.
- Click “OK”
- Verify that Administrators was added to the group or user name

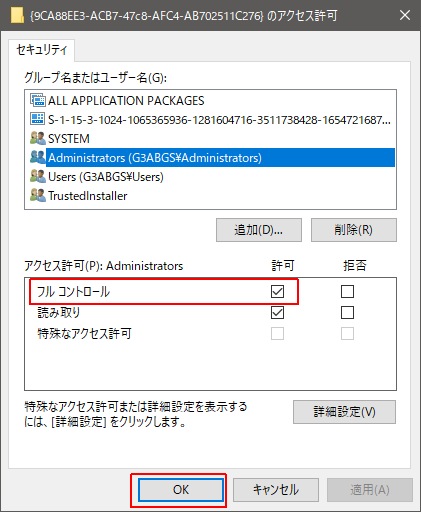
3. Set to full control
- Select Administrators from group name or user name
- Full control of permissions ☑ Check permission
- Click OK
4. Start Component Services
W10> Start Menu> Windows Management Tool> Component Services
This procedure uses Component Services.You can start Component Services in one of the following ways:
- Launch Run, enter dcomcnfg as the name and click OK
- W10> Start Menu> Windows Management Tool> Transition to Component Service
If you need detailed explanation, please read the following article.
5. Add Users to Launch and Activation Permissions
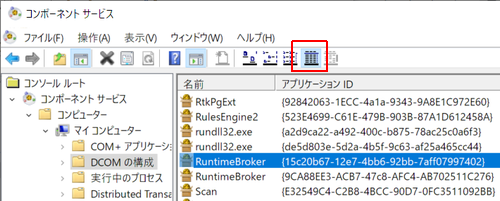
5.1 Find Application ID
The APPID can be found visually in the "Application ID" column displayed in the right pane when you select the DCOM configuration. There is no search function.
Change the display mode to Details and look for {15C20B67-12E7-4BB6-92BB-7AFF07997402} in the Application ID column.
The name is Runtime Broker.
There are two Runtime Brokers, so be careful not to make a mistake.
| Console root ∨ Component service ∨ Computer ∨ My computer >DCOM configuration |
 |
Change the display mode to Details and look for {15C20B67-12E7-4BB6-92BB-7AFF07997402} in the Application ID column.
The name is Runtime Broker.
There are two Runtime Brokers, so be careful not to make a mistake.
| APPID name | APPID |
| RuntimeBroker | {15C20B67-12E7-4BB6-92BB-7AFF07997402} |
 | |
5.2 Add Users to RuntimeBroker {15C20B67-12E7-4BB6-92BB-7AFF07997402}
5.2.1
RuntimeBroker {15C20B67-12E7-4BB6-92BB-7AFF07997402}> Right click> Properties
5.2.2
Security tab> Launch and Activation Permissions> Edit
Select Remove if Windows Security appears.
Windows security
One or more of the permission entries attached to the registry value cannot be viewed because it is an unrecognized type or application-specific (callback) type.
-Click Delete to remove unrecognized and callback permission entries. Note that inherited permission entries will not be deleted. The reason is that you can only delete it at the level of the corresponding parent, or you can break inheritance on this object.
-Click Cancel to view only the recognized permission entries as read-only without changing the permissions.

5.2.3
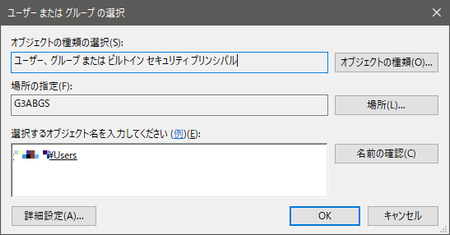
Add > Detailed settings > SearchClick Add> Advanced and click Search from the dialog that appears. Select Users from the search result list and click OK .

5.2.4
Select users or groupsClick OK after confirming that Users is added under "Enter the object name to select" .
5.2.5
Launch and activation permissionsWith Users selected, check ☑Activate from local under "Permissions" and click OK. Click on OK (or OK after applying) as it transits to the property screen of RuntimeBroker.

6. Restore owner
Change the owner of AppID\{15C20B67-12E7-4BB6-92BB-7AFF07997402} back to TrustedInstaller.TrustedInstaller does not hit even if it is searched, so enter it directly.
The values to enter are as follows.
| Input value | NT SERVICE\TrustedInstaller |
 | |
7. End of procedure
This completes the procedure.Restart your PC and check the Event Viewer.
If no messages are logged, the procedure was successful.
Afterword
2019/03/26I found a useful tool called ExecTI.
ExecTI is software that creates a state where the TrustedInstaller account has started the component services.
ExecTI is made by the same team as Winaero Tweaker, a tool for adjusting Windows system settings with a GUI.
Taking this article as an example,
ExecTI eliminates the step of changing the APPID owner to Administrators. At the same time, since you do not touch the registry editor, you can reduce the risk of operation mistakes.
Therefore,
Repair procedure using ExecTI RuntimeBroker Plan-B is recommended.
For more information about ExecTI, Winaero Tweaker, please read the related article.

Validation: Windows 10 Pro October 2018 Update, v1809
:SC2
このサイトを検索 | Search this site

![[EventId 1008] BITSのOpenプロシージャに失敗しました(Perflib)](https://blogger.googleusercontent.com/img/b/R29vZ2xl/AVvXsEiN6dqRB2WfXdfAKB10FDjdJ2p22frW5ahcNd07xf7-Dux9uDfiM1RGf7v6iO-QRooVfr3FsZNkpRKcO8Or0JcmQeJ5ud_ns3dfE7tQwoVZB2bsZbTKUaxVjG_CqSTho3hre6kT7T4mOBGz/w680/redyellow_317x.gif)


![en[EVENT10016] RuntimeBroker {15C20B67-12E7-4BB6-92BB-7AFF07997402}](https://blogger.googleusercontent.com/img/b/R29vZ2xl/AVvXsEgIWemCkzPBfjPT3rC3-ZO4C8W5BnQFrwV7BIvXVLKEb0TOZgxnyfS-MVAYUZhmdmHB20mutJOI1N04LhxUpnwgsKzsBTFe5S-jl1H0x1uB1ZH2peyG7fxuXOcccfsIrjkTw4Zv6JFGZ3jL/w680/regedit-search450x.png)


0 コメント
質問はご遠慮ください。不適切なコメントは公開しません。コメントに自サイトの宣伝を書くのはお控えください。