まえがき
IrfanView は高速でコンパクトなグラフィックビューアですが、スクリーンキャプチャ機能を持っています。
WinShot とほぼ同等の機能を持っています。
IrfanView のスクリーンキャプチャを利用する方法の具体例を紹介します。
[IrfanView スクリーンキャプチャの起動方法]
- メニューから起動する
- [/capture=x] を付加したショートカットから起動する
ソフトウェア情報
※記事とは異なるバージョンが表示される場合があります。
IrfanView スクリーンショットを利用する方法
選択肢A
IrfanViewを起動している時は、メニューからスクリーンショットモードに移行させることができます。
以下の階層を辿ります。
IrfanView > Options > Capture/Screenshots...
または、
IrfanViewのウィンドウにフォーカスを当てた状態で、キーボードのCを押します。
選択肢B
コマンドラインオプションを追記した IrfanView のショートカットから起動します。
[手順]
- IrfanViewのショートカットを作成する
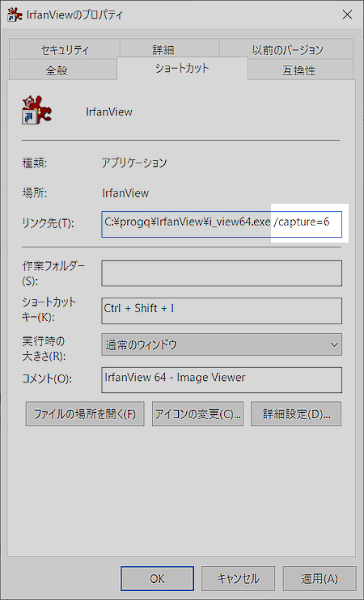
- ショートカットのプロパティを表示する
- リンク先の横のボックスに /capture=x を追記する
- OKをクリックする
- ショートカットをダブルクリックしてIrfanViewを起動する
- 以上
スクリーンショット
...\iview_x64\i_view64.exe /capture=xx:[0~7] の一桁の数字を設定します。
[/capture=6] を設定した時の画像
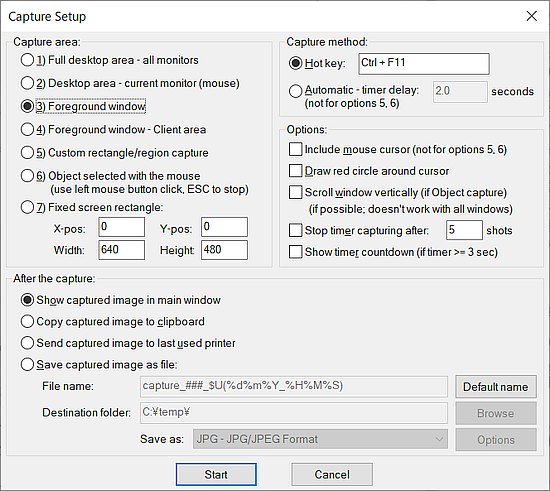
撮影領域
※/capture=x に指定する [x] の値とはリンクしていません。
| Capture area | Google 翻訳 | |
| 1 | Full desktop area - all monitors | フルデスクトップ領域-すべてのモニター |
| 2 | Desktop area - current monitor (mouse) | デスクトップ領域-現在のモニター(マウス) |
| 3 | Foreground window | 前景ウィンドウ |
| 4 | Foreground window - Client area | 前景ウィンドウ-クライアント領域 |
| 5 | Custom rectangle/region capture | カスタム長方形/領域キャプチャ |
| 6 | Object selected with the mouse (use left mouse button click, ESC to stop) | マウスで選択されたオブジェクト (マウスの左ボタンクリック、ESCを使用して停止) |
| 7 | Fixed screen rectangle: | 固定画面の長方形: |
スクリーンショット
撮影方法
[選択肢A]
- 選択肢Aを実行する
- 撮影領域の「アクティブウィンドウ全体」を選択する
- 撮影方法、出力処理などを選択する
- 開始を押す
- IrfanViewがスクリーンショットモードに移行する
- 撮影したいウィンドウをアクティブにする
- Ctrl+F11を押す(任意のキーに変更可能)
- アクティブウィンドウの画像がIrfanViewに表示される
- 保存する
- 以上
[選択肢B]
- /capture オプションを追記したショートカットからIrfanViewを起動する
- IrfanViewが指定したキャプチャーモードで起動する
- キャプチャーモードに対応した操作を実行する
- キャプチャーした画像がIrfanViewに表示される
- 保存する
- 以上
/capture の引数
i_options.txt から /capture セクションを引用します。
出典:i_options.txt
capture values:0 = whole screen
1 = current monitor
2 = foreground window
3 = foreground window - client area
4 = rectangle selection
5 = object selected with the mouse
6 = start in capture mode (can't be combined with other commandline options)
7 = fixed rectangle (using capture dialog values or direct input)
Example for capture:
i_view32.exe /capture=0
=> Capture the whole screen
i_view32.exe /capture=6
=> start in Capture mode, use last used capture dialog settings
i_view32.exe /capture=7
=> Capture the screen rectangle from GUI/Capture dialog (=INI values)
i_view32.exe /capture=7=(0,0,800,600)
=> Capture the screen rectangle: x (0), y (0), width (800), height (600)
Advanced examples:
i_view32.exe /capture=2 /convert=c:\test.jpg
Capture foreground window and save result as file.
i_view32.exe /capture=2 /convert=c:\capture_$U(%d%m%Y_%H%M%S).jpg
Capture foreground window and save result as file; file name contains time stamp.
あとがき

全てのキャプチャーオプションを試しましたが、/capture=6(引数:6)が使いやすいと思いました。
[手順]
- IrfanViewショートカットに /capture=6 を追記する
- ショートカットからIrfanViewを起動する
- IrfanViewが前回使用したキャプチャーモードで起動する※Cを押してキャプチャーモードを変更することができます
- Ctrl+F11を押す
- キャプチャーした画像がIrfanViewに表示される
- 保存する
- 以上
検証:IrfanView 4.54
:SC2
このサイトを検索 | Search this site

![[EventId 1008] BITSのOpenプロシージャに失敗しました(Perflib)](https://blogger.googleusercontent.com/img/b/R29vZ2xl/AVvXsEiN6dqRB2WfXdfAKB10FDjdJ2p22frW5ahcNd07xf7-Dux9uDfiM1RGf7v6iO-QRooVfr3FsZNkpRKcO8Or0JcmQeJ5ud_ns3dfE7tQwoVZB2bsZbTKUaxVjG_CqSTho3hre6kT7T4mOBGz/w680/redyellow_317x.gif)


![en[EVENT10016] RuntimeBroker {15C20B67-12E7-4BB6-92BB-7AFF07997402}](https://blogger.googleusercontent.com/img/b/R29vZ2xl/AVvXsEgIWemCkzPBfjPT3rC3-ZO4C8W5BnQFrwV7BIvXVLKEb0TOZgxnyfS-MVAYUZhmdmHB20mutJOI1N04LhxUpnwgsKzsBTFe5S-jl1H0x1uB1ZH2peyG7fxuXOcccfsIrjkTw4Zv6JFGZ3jL/w680/regedit-search450x.png)