This article has been removed.
The content of this blog can be searched by keyword.
Use the search window in the sidebar or at the top. Alternatively, please translate the original article using Google or other means.
Please find alternative content.
Remnants of articles that had been published
IrfanView 4.51 has been released.
So far, when installing IrfanView, I have downloaded and manually installed the .zip file, but since I have installed IrfanView 4.51 using the installer, I will take notes on the detailed steps.
Using the installer has the following advantages.
- The installer of Japanese file (japanese.dll) can recognize the installation folder of IrfanView.
- You can create a shortcut to launch IrfanView on your desktop.
- A shortcut can be created on the desktop to launch IrfanView in thumbnail mode.
- You can create a shortcut for IrfanView in the start menu.
IrfanView 4.51 Installation Instructions
This procedure describes the installation procedure using IrfanView installer iview 451_x64_setup.exe (64-bit version).
Get the IrfanView installer from the official site.
The installer is available in 64-bit and 32-bit versions.
The 32-bit version of the installer also works on Windows 64-bit.
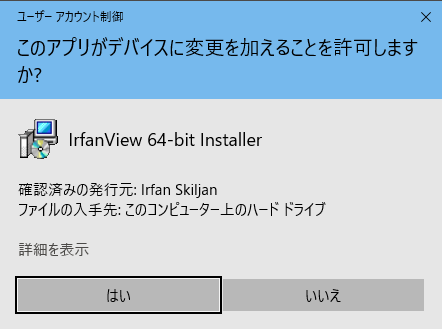
When you run the installer, UAC (User Account Control) will start, so select "Yes".
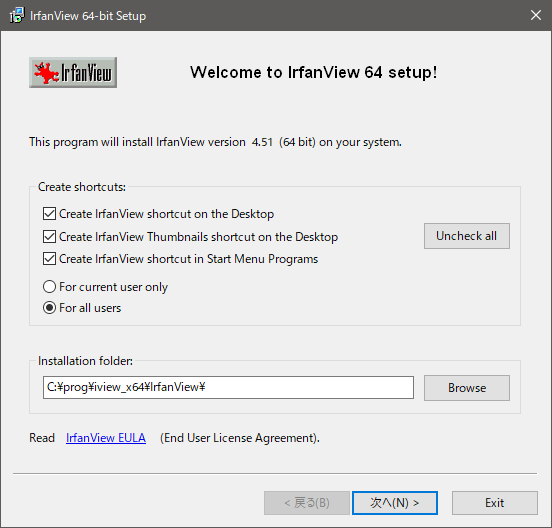
Choose an installation option.
This program will install IrfanView version 4.51 ( 64 bit ) on your system.
Check ☑ to create a shortcut.
Create shortcuts:
- Create IrfanView shortcut on the Desktop
- Create IrfanView Thumbnails shortcut on the Desktop
- Create IrfanView shortcut in Start Menu Programs
(Parallel translation)
- Create IrfanView Shortcut on the Desktop
- Create a shortcut for IrfanView thumbnails on the desktop
- Create IrfanView Shortcut in Start Menu Program
Choose an installation mode.
- For current user only: Login user only mode
- For all users: All user mode
Click Browse to display the folder selection screen.
- Installation folder: C:\Program files\iview_x64
Click Next when you have decided on your installation options.
A description of the new features of Version 4.51 will be displayed. Click “Next”.
Version 4.51 (Release date: 2018-02-27)
-Improved JPG save option: "Set file size" (no RIOT PlugIn needed)
-New options in IrfanView Shell Extension (PlugIns website)
-Support for animated WebP files
-Some fixes (Zoom box text, EXE / DLL icon loading)
-Several PlugIns are changed / updated, please install the newest versions:
Download from: http://www.irfanview.com/plugins.htm

Check the extension you want to associate. Or
Click the button below.
- Images only
- Select all
- None
If you want to review the association, let's do from the setting screen after installation is complete. (Refer to the afterword)

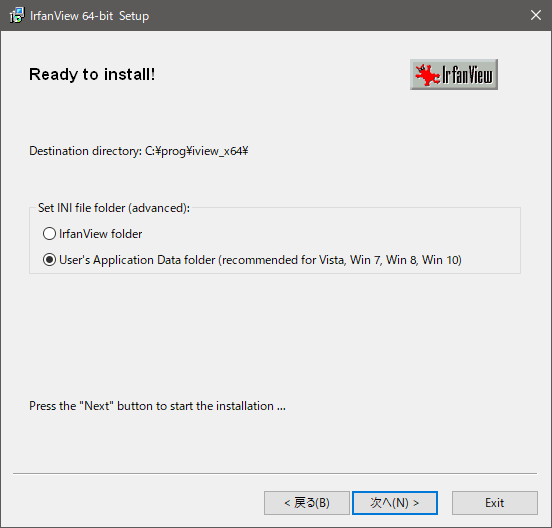
This is the final confirmation screen before starting installation.
Choose a destination for the .INI file.
An .INI file is a text file that contains IrfanView configuration information.
If your installation folder is C:\Program files \, select User's Application Data folder.
If you select the IrfanView folder,
Since IrfanView can not access the Windows system folder C:\Program files\when running in user mode (normal startup), it can not read or write configuration information (.INI file).
Set INI file folder (advanced):
- IrfanView folder
- User's Application Data folder (recommended for Vista, Win 7, Win 8, Win 10)
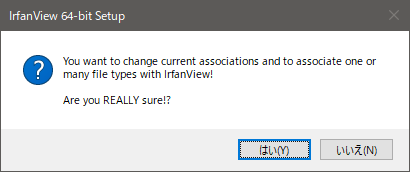
This time, IrfanView has been upgraded from v4.50 to v4.51 and the confirmation dialog is displayed because the extension association has been changed to all image files (images only).
You want to change current associations and associates one or many file types with IrfanView!
Are you REALLY sure !?
Parallel translation
Change the current association and associate one or more file types with IrfanView. Is it really good?
Click “Done” to complete the installation.

This completes the installation procedure.
Please read related articles when an association error occurs.
Afterword
When updating IrfanView, plug-ins are also often updated, so update them at the same time.
The plug-in is 64-bit | 32-bit, so let's choose the same one as the installer's architecture.
If you are installing Japanese files, the Japanese files uploaded to the official site may have their configuration files updated without changing their file names, so let's update the Japanese files as well.
Association later
During the installation, a setting screen for associating an image file with IrfanView is displayed, but let's complete the installation first without changing the settings there.
In this case, I selected "Images only" in the "Association" dialog, and completed the installation, but the JPG | PNG association was reset.
And you can no longer change the association in the usual way.
If you are in the same state, please refer to related articles.

IrfanView v4.67 (5 Apr 2024), OCR functionality revamped, installation instructions available
IrfanView Version 4.67 released, with OCR feature update requiring Tesseract OCR plug-in. Japanese language files not yet available.
 kzstock.blogspot.com
このサイトを検索 | Search this site

![[EventId 1008] BITSのOpenプロシージャに失敗しました(Perflib)](https://blogger.googleusercontent.com/img/b/R29vZ2xl/AVvXsEiN6dqRB2WfXdfAKB10FDjdJ2p22frW5ahcNd07xf7-Dux9uDfiM1RGf7v6iO-QRooVfr3FsZNkpRKcO8Or0JcmQeJ5ud_ns3dfE7tQwoVZB2bsZbTKUaxVjG_CqSTho3hre6kT7T4mOBGz/w680/redyellow_317x.gif)


![en[EVENT10016] RuntimeBroker {15C20B67-12E7-4BB6-92BB-7AFF07997402}](https://blogger.googleusercontent.com/img/b/R29vZ2xl/AVvXsEgIWemCkzPBfjPT3rC3-ZO4C8W5BnQFrwV7BIvXVLKEb0TOZgxnyfS-MVAYUZhmdmHB20mutJOI1N04LhxUpnwgsKzsBTFe5S-jl1H0x1uB1ZH2peyG7fxuXOcccfsIrjkTw4Zv6JFGZ3jL/w680/regedit-search450x.png)