Thank you for accessing.
This article has been removed.
The content of this blog can be searched by keyword.
Use the search window in the sidebar or at the top. Alternatively, please translate the original article using Google or other means.
Please find alternative content.
,
Remnants of articles that had been published
FilterProxy is an Android application that acts as a local proxy server with ad blocker-like elements.
root is not required.
The functions are as follows.
Source: Google Play
- Acts as a local proxy
- Blocks access to URLs matching the pattern (default returns as '403 Forbidden'. Can be changed).
- You can register URL patterns that you do not want to block
- Redirect the URL that matches the condition to another URL (internal redirect function)
- Rewrite HTTP request header
This article is ...
FilterProxy acts as a local proxy server, so nothing happens if you just install it.The following steps are mandatory.
- Install FilterProxy
- Add proxy settings to your mobile network
- Add proxy settings to Wi-Fi access point
- end.
This article
This article describes the procedure for adding proxy settings for FilterProxy to Android devices.
[content]
- FilterProxy software information
- Mobile network example
- Wi-Fi access point example
FilterProxy software information
App information
* Quoted from Google Play
FilterProxy 2.4.10 2015-02-21, Neutral Tao
What I think when I look at the PC page on an Android device is that there are too many advertising images! I don't want to see useless advertisement images because the bandwidth is so narrow. So I made this app.
* Quoted from Google Play
FilterProxy 2.4.10 2015-02-21, Neutral Tao
What I think when I look at the PC page on an Android device is that there are too many advertising images! I don't want to see useless advertisement images because the bandwidth is so narrow. So I made this app.
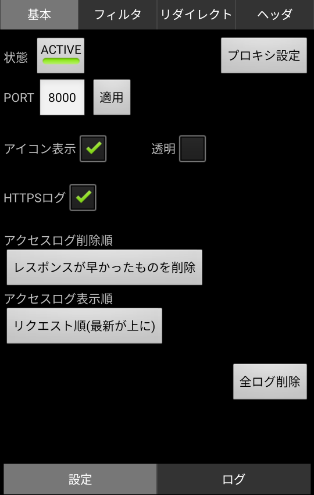
Filter Proxy menu structure
Famous advertising sites are pre-registered in the block list, so you can block some ads even if you keep the default.You can add URLs or domains to the Deny list.
The menu is as follows.
- Basic (Settings | Log)
- Filter (Deny list | Allow list | Log)
- Redirection (List | Edit | Log)
- header
| function | Sub menu | |
| Basic | Settings | Log Set the PORT number etc. | |
| filter | Deny list | Allow list | Log Register a site to be denied access | |
| redirect | List | Edit | Log Forced redirect to the registered site | |
| header | Rewrite header information such as User-Agent | |
Basic settings of FilterProxy
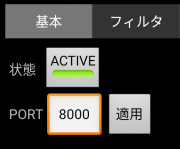
A common proxy port is 8080, but FilterProxy defaults to "PORT: 8000 ".This port number is the value set for the mobile network and Wi-Fi proxy port.
The port number can be changed to any value, but it is desirable to set it between 8000 and 9000 in order to avoid the port number whose purpose is defined by the Internet Assigned Numbers Authority (IANA).
It is a snapshot of FilterProxy with PORT: 8000.
Networks available on Android
There are two types of communication methods for smartphones (Android devices), but add proxy settings to the network you want to pass through FilterProxy.- Mobile network (SIM card communication)
- Wifi
Mobile network example
The mobile network refers to the access point name (APN) contracted with the telecommunications carrier.APNs of 3 domestic carriers (DOCOMO, KDDI, SoftBank) and MVNO (cheap SIM card provider) are applicable.
You can add the APN yourself, so we recommend that you add a new access point dedicated to Filter Proxy instead of editing an existing access point.
By doing so,
If you cannot connect to the Internet due to Filter Proxy, you can switch to carrier connection with one touch.
If you have a contract with Mopera U and SP mode like me and you want to pass both through FilterProxy, change each APN setting.
The following items are added to the settings.
- name
- APN
- Proxy
- port
To display the APN setting screen of an Android device, transition as follows.
Android > Settings > Wireless & networks > Mobile network > Access point name > Contract provider name (mopera U etc.) > Edit access point (or create new)
For the proxy server, specify the loopback address (localhost or 127.0.0.1). By specifying this value, the Android device will refer to FilterProxy.
For the proxy port, set the PORT number used by Filter Proxy. The default value is 8000, but you can change it.
Do not use the reserved port numbers specified by IANA. Use any number between 8000 and 9000.
For the port number, please read the external link at the end of the sentence.
| Setting items | Set value | Remark |
| name | mopera U 8000 | Carrier name + port number and other identifiable names |
| APN | mopera.net | Contracted carrier network |
| Proxy | localhost | Or 127.0.0.1 |
| port | 8000 | Port number of FilterProxy |
 | ||
Wi-Fi access point example
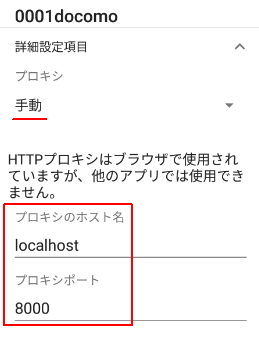
Add the value of "Setting value" in the table below for each Wi-Fi access point.| Setting items | Set value | Remark |
| Proxy | manual | Default value: None |
| Proxy host name | localhost | Or 127.0.0.1 |
| Proxy port | 8000 | Port number of FilterProxy |
| Do not use proxy | Any | Host name that bypasses FilterProxy |
| IP settings | DHCP | Default value: DHCP |
Setting procedure (Wi-Fi)
- Android > Settings > Wi-Fi > (0001docomo)
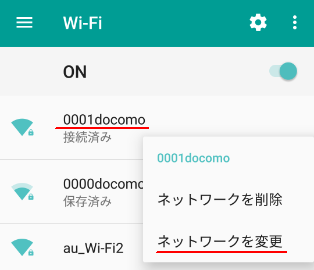
Next, tap ∨ at the right end of "Detailed setting item".
Similar application
Browser app
Searching for Adblock as a keyword on Google Play will result in multiple hits of browser apps with ad blocking function. (Brave etc.)If you find this procedure difficult, let's use the browser application bundled with the ad blocking function.
Development of Adblock Plus for Android Kai has stopped, but it is possible to make it work.
- Adblock Plus for Android Kai # 255 ( gmbk0.tumblr.com )
Proxomitron
Proxomitron is a local proxy server software that runs on Windows.The author, Scott R. Lemmon, passed away on May 1, 2004, so no new version will be released, but I have confirmed that it works on Windows 10.
The usage is similar to FilterProxy, and you can browse with a few ads without being detected by Adblock Killer simply by specifying Proxomitron in the browser proxy settings.
If you are interested, please read the related article.
Summary
Checkpoints for linking Android device and FilterProxy are as follows.- Specify the loopback address for the proxy server address (localhost | 127.0.0.1)
- Specify the port number of FilterProxy to Android proxy
- Add proxy settings for each network through FilterProxy
Verification: android 10 / FilterProxy 2.4.10
:SC2
このサイトを検索 | Search this site


![en[Event ID 10016] How to fix PerAppRuntimeBroker error](https://blogger.googleusercontent.com/img/b/R29vZ2xl/AVvXsEjaZik97wjiIY5AhG5wgWpb6QknqoQYH8QEqj92XWmtDVerqvarbEA_8rKr1_tHFjNwXTLwITIw6vspCYSoZirr7xS7MKzgWJGLLWDgBGW_xIr-ymWJ9J4ewRzbTmn163jrpG4J-l3wtvj0/w680/execti-comexp.msc.png)