
en-event,event log
This article describes Event ID 10016.
EVENT-ID-10016 is recorded when there is a problem with the DCOM component.
In this case, the log shows that NETWORK SERVICE cannot access Runtime Broker.
It is possible to find the APPID and try to repair it.
| NETWORK SERVICE: | Windows built-in account |
| APPID: | Application id |
| RuntimeBroker: | APPID name (DCOM component) |
| Component services: | Windows management tools |
Well, the main subject.
This log informs that there is a problem with APPID {9CA88EE3-ACB7-47C8-AFC4-AB702511C276}.When you open Component Services, {9CA88EE3 -...} is given the name RuntimeBroker, so look for RuntimeBroker when repairing.
I will share the repair procedure I performed.
There is a RuntimeBroker with the same name with a different APPID, so be careful to correct the target to be repaired.
Event Log
The event log is reprinted.| message | CLSID for application-specific permission settings {D63B10C5-BB46-4990-A94F-E40B9D520160} And APPID {9CA88EE3-ACB7-47C8-AFC4-AB702511C276} Local activation permissions for the COM server application to the user NT AUTHORITY\NETWORK SERVICE SID (S-1-5-20) at address LocalHost (using LRPC) running in the application container unavailable SID (not available) Can't give This security permission can be modified using the Component Services administration tool. |
| log name | system |
| Source | DistributedCOM (DCOM) |
| Event id | 10016 |
| level | error |
| user | NETWORK SERVICE |
| APPID | {9CA88EE3-ACB7-47C8-AFC4-AB702511C276} |
| APPID name | RuntimeBroker |
Repair procedure
This procedure assumes that you are logged in to the PC with an account that belongs to Administrators or an account that has administrator privileges.Since the repair procedure is long and moves back and forth between the registry editor and component services, I will write the whole flow.
[Overall flow | PLAN-A]
- Change the owner of APPID (Registry Editor)
- Set changed owner permissions to full control
- Add LOCAL SERVICE to APPID (component service)
- Revert the changed owner (Registry Editor)
- Restart your PC
PLAN-B
If you are not good at Registry Editor, please read the related article as there is also a way to skip the procedure of Registry Editor. (PLAN-B)1. Change the owner of APPID
Registry operations are at your own risk
Before working with Registry EditorMake a backup copy of your registry in case something goes wrong.
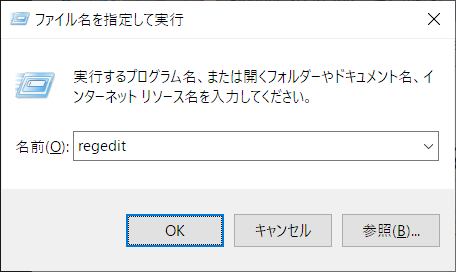
1.1 Start Registry Editor
- Start the execution by specifying the file name ( Win + R ).
- Type regedit in the box next to your name
- OK Click on the
1.2 Search APPID
- Launch the search dialog (Ctrl + F | Edit> Search)
- Enter {9CA88EE3-ACB7-47C8-AFC4-AB702511C276}
- Click Find Next
search results:
\HKEY_CLASSES_ROOT\AppID\{9CA88EE3-ACB7-47c8-AFC4-AB702511C276}
\HKEY_CLASSES_ROOT\AppID\{9CA88EE3-ACB7-47c8-AFC4-AB702511C276}
1.3 Change Owner from TrustedInstaller to Administrators
Right-click and select "Permissions" from the context menu.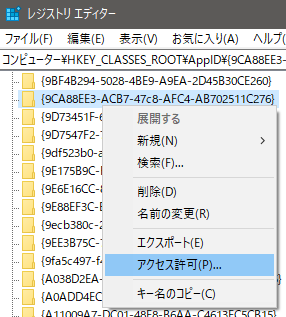
In my environment Administrators permissions were "read".
If you check Full Control and click OK, you will get an error, so you need to take ownership of the registry key before you can run it.
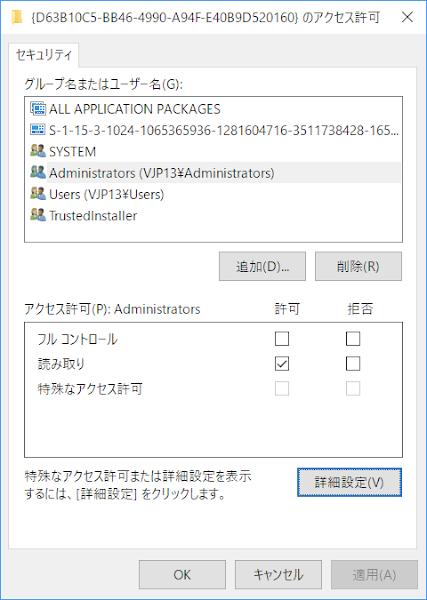
Click Advanced (V) , and the owner is TrustedInstaller on the transition screen, so click Change.

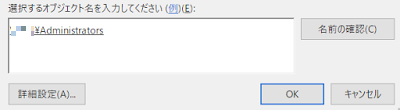
Click Advanced (A) ... on the user or group selection screen .

When you click Search (N) , Administrators will be listed, so select it and clickOK . Select the one with s at the end.

Once you have verified that the PC name in Please enter the object to be selected ¥ Administrators have been added OK click, the screen to transition OK and then click.
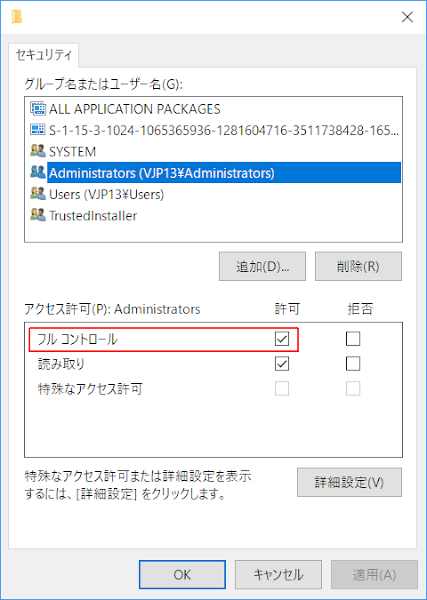
2. Set changed owner permissions to full control
- Select Administrators of group name or user name
- Permission in the window below Full Control ☑ Check Permission and click OK
3. Start component service and add LOCAL SERVICE to APPID
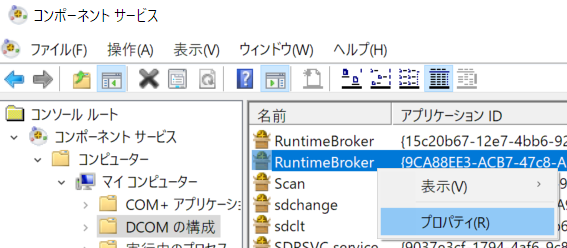
3.1 Start Component Services
- Launch Run , enter dcomcnfg as the name and click OK
- Or Start Menu> Windows Administrative Tools> Component Services
3.2 Find Application ID
The APPID can be found visually in the "Application ID" column displayed in the right pane when you select the DCOM configuration. There is no search function.| Console root ∨ Component service ∨ Computer ∨ My computer >DCOM configuration |
 |
Look for {9CA88EE3-ACB7-47c8-AFC4-AB702511C276} in the Application ID column.
| APPID name | APPID |
| RuntimeBroker | {9CA88EE3-ACB7-47c8-AFC4-AB702511C276} |
 | |
3.3 Add NETWORK SERVICE to Runtime Broker
If you started Component Service (dcomcnfg) before editing the registry, you can edit it by restarting Component Service.
RuntimeBroker> Right click> Properties
Since multiple RuntimeBroker are registered, select the one corresponding to the application ID {9CA88EE3-ACB7-47C8-AFC4-AB702511C276} to be edited.
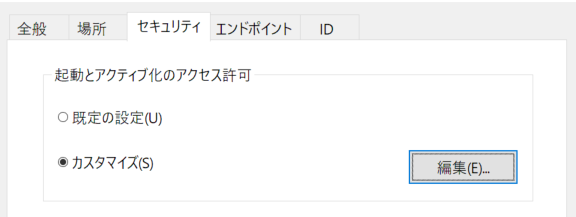
Security tab> Launch and Activation Permission> Edit ...
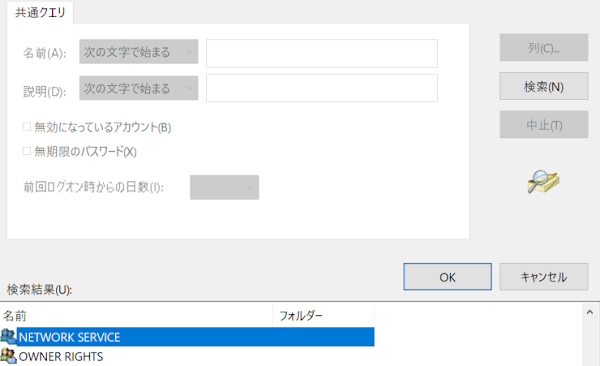
Add > Detailed settings > Search
- Add> Go to advanced settings
- Click Search (N) from the displayed dialog
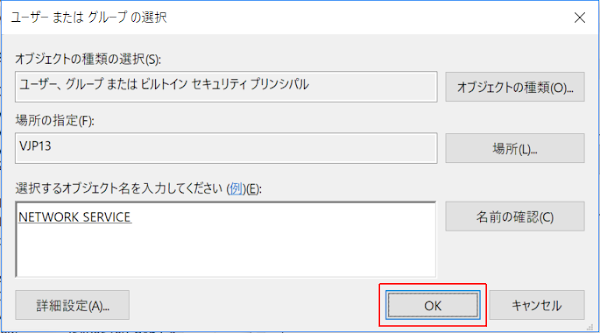
- Select NETWORK SERVICE from the search result list
- OK Click on the
Confirm that NETWORK SERVICE is added in the window below "Enter the object name to select" and click OK .
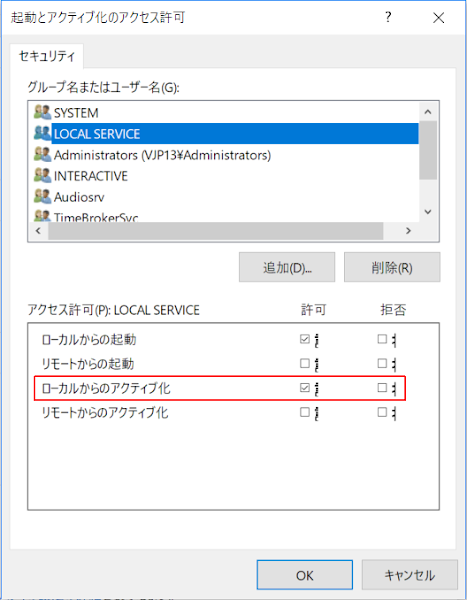
Launch and activation permissions
With NETWORK SERVICE selected, check ☑Activate from local under "Permissions" and click OK .
Click on OK (or OK after applying) as it transits to the property screen of RuntimeBroker.
4. Revert the changed owner
We recommend that you regain ownership of the registry after completing the Component Services steps.TrustedInstaller is not displayed even if it is searched, so enter it directly.
| Input value | NT SERVICE\TrustedInstaller |
 | |
5. Restart your PC
Restart your PC and check the Event Viewer.If the events no longer appear in the event log, the procedure was successful.
Summary
You cannot change the settings unless you change the owner of the Runtime Broker. And when you're done, don't forget to perform the process of returning the owner.[procedure]
- Change Owner to TrustedInstaller → Administrators
- Change Runtime Broker settings
- Change the owner to Administrators → TrustedInstaller (Undo)
User type
The users logged in the DCOM error include:- LOCAL SERVICE
- NETWORK SERVICE (This article)
- Login Account
- ... etc
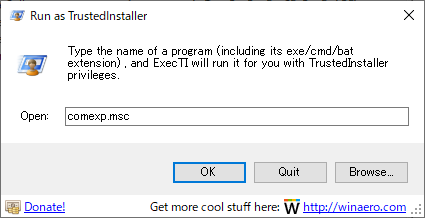
ExecTI
I have found ExecTI, a free software that allows you to edit Runtime Brokers directly without using a registry editor.The following steps are unnecessary.
- Launch Registry Editor and change APPID Owner
- Launch Registry Editor and restore APPID owner
ExecTI is published on Winaero.com.
For a concrete example of using ExecTI, please read the related article because the article that repaired Runtime Broker with a different APPID from this time is uploaded.
- RuntimeBroker
- APPID: {15C20B67-12E7-4BB6-92BB-7AFF07997402}
RuntimeBroker
When you search with RuntimeBroker, bad reputation such as "CPU usage 100%" is noticeable.Such a phenomenon is not seen on our PC, but it seems better to deal with the error.
RuntimeBroker.exe monitors access to Windows APIs and ensures that your application does not violate Windows core security.
Checks if the Windows Store app has declared all permissions to access the resource while running. This also includes letting you know if you have permission.
This process handles security permissions for processes such as sensors, cameras.
Therefore, it helps protect your privacy when using Windows Store applications.
thewindowsclub.com
Timing at which event ID 10016 is recorded
The commentary article on the official Microsoft website is quoted.
DCOM Event ID 10016 is logged on Windows 10 and Windows Server 2016
This issue occurs because the particular process does not have the permissions on the DCOM component that are listed in the event log.
~
You can safely ignore these events.
support.microsoft.com
This issue occurs because the particular process does not have the permissions on the DCOM component that are listed in the event log.
~
You can safely ignore these events.
support.microsoft.com
Validation: Windows 10 Pro Fall Creators Update, v1709
:SC2
このサイトを検索 | Search this site

![[EventId 34] Bluetoothマウスが切断される原因と対処法!BTHUSBの警告ログに注意](https://blogger.googleusercontent.com/img/b/R29vZ2xl/AVvXsEiN6dqRB2WfXdfAKB10FDjdJ2p22frW5ahcNd07xf7-Dux9uDfiM1RGf7v6iO-QRooVfr3FsZNkpRKcO8Or0JcmQeJ5ud_ns3dfE7tQwoVZB2bsZbTKUaxVjG_CqSTho3hre6kT7T4mOBGz/w680/redyellow_317x.gif)

![en[EVENT10016] Windows.SecurityCenter.WscDataProtection](https://blogger.googleusercontent.com/img/b/R29vZ2xl/AVvXsEhvJoFW2DHhrFvUwjdLrbVO7FvShXv7HF9HAOqhzTJFan_QNy7W-SBOPutM8Qcc3Rwm7KF4cQqL-D4G0_HEUIKRhO9bDnDKXLATmPrbFYfy0fyl2519jSd_TPXHAZBIhG3jE31NQHE8W-Jw/w680/regedit.png)


0 コメント
質問はご遠慮ください。不適切なコメントは公開しません。コメントに自サイトの宣伝を書くのはお控えください。